Modern software development has incorporated web automation to enable effective testing and guarantee the quality of web applications.
Recently, I had the opportunity to investigate Playwright Codegen, which can be a valuable tool for test automation. In this blog post, I want to share my experience with Playwright Codegen, from setting it up in VS Code to creating tests, editing the generated code, dealing with viewport issues, and giving a general evaluation of its benefits and drawbacks.
What is Playwright Codegen?
Playwright Codegen is a powerful tool that simplifies the process of test automation. It enables users to effortlessly generate code by recording their interactions with a website, eliminating the need for manual coding. With Playwright Codegen, individuals involved in test automation can create robust scripts in programming languages, such as JavaScript, Python, or TypeScript, without being programming experts. Whether you’re a QA engineer or a testing enthusiast, Playwright Codegen streamlines the automation process, making it accessible to many users.
Setting up Playwright Codegen in Visual Studio Code
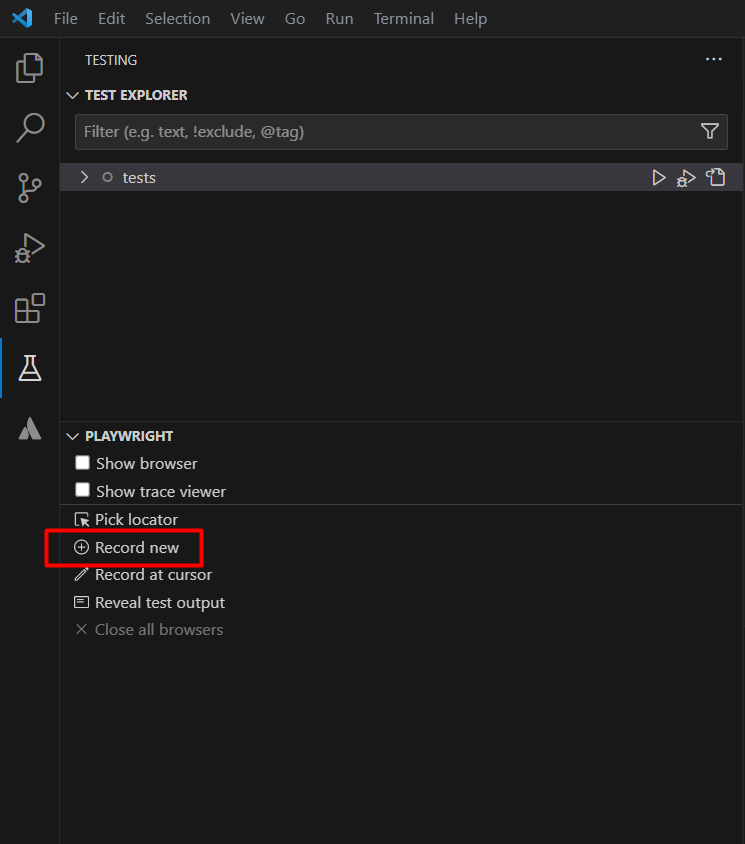
Getting started with Playwright Codegen in Visual Studio Code was a breeze. After creating the package.json file and installing the Playwright package using: npm install @playwright/test, I quickly added the Playwright VS Code extension to my workspace. Within minutes, I was ready to dive into the world of code generation.

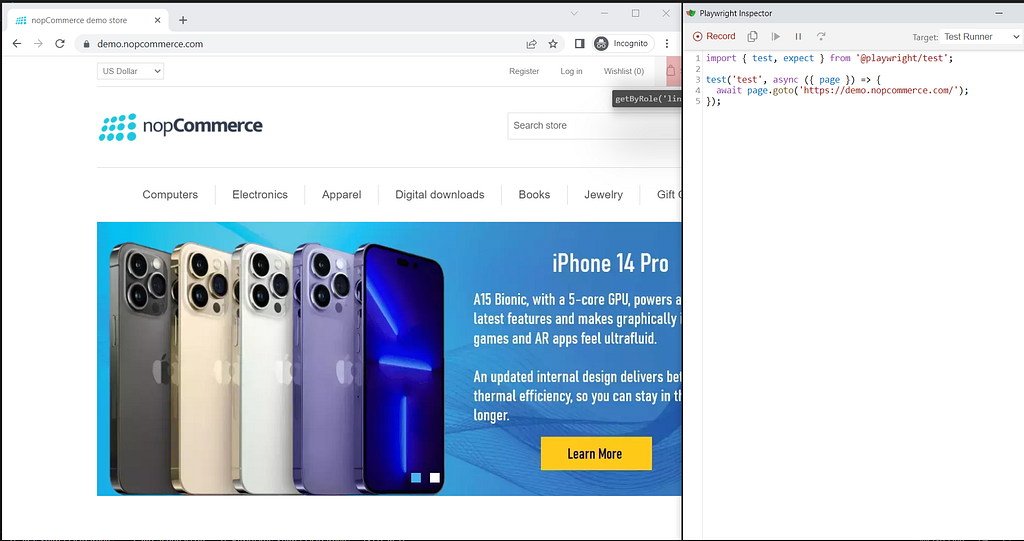
Using the Playwright Inspector was equally convenient, and I prefer this option. I launched Playwright Inspector with the command: npx playwright codegen [URL]. While recording tests two windows will be opened, a browser window and the Playwright Inspector window, where you can register your tests and copy them into your editor.

Let’s Create a Test with Playwright Codegen
To demonstrate how Playwright Codegen works, let’s create a test that verifies an end-to-end flow on the eCommerce website. Below is the generated code for the test, along with comments to explain each step:
test('Verify end-to-end flow for purchasing product', async ({ page }) => {
  // Go to demo.nopcommerce website
  await page.goto('https://demo.nopcommerce.com/');

  // Click on the 'Computers' link
  await page.getByRole('link', { name: 'Computers' }).click();

  // Click on the 'Notebooks' link within the 'Notebooks' heading
  await page.getByRole('heading', { name: 'Notebooks' })
            .getByRole('link', { name: 'Notebooks' }).click();

  // Click on the 'Apple MacBook Pro 13-inch' link
  await page.getByRole('link', { name: 'Apple MacBook Pro 13-inch', exact: true }).click();

  // Click on the 'Add to cart' button
  await page.locator('#add-to-cart-button-4').click();

  // Click on the 'Close' button
  await page.getByTitle('Close').click();

  // Click on the 'Shopping cart (2)' link
  await page.getByRole('link', { name: 'Shopping cart (2)' }).click();

  // Check the checkbox with the label 'I agree with the terms of service and I adhere to them unconditionally'
  await page.getByLabel('I agree with the terms of service and I adhere to them unconditionally').check();

  // Click the button 'Checkout'
  await page.getByRole('button', { name: 'Checkout' }).click();

  // Click the button 'Continue'
  await page.getByRole('button', { name: 'Continue' }).click();

  // Check the checkbox with the label 'Next Day Air ($0.00)'
  await page.getByLabel('Next Day Air ($0.00)').check();

  // Click the button 'Continue'
  await page.getByRole('button', { name: 'Continue' }).click();

  // Check the radio button with the label 'Check / Money Order'
  await page.getByRole('radio', { name: 'Check / Money Order' }).check();

  // Click the button 'Continue'
  await page.getByRole('button', { name: 'Continue' }).click();

  // Click the element with the ID 'checkout-step-payment-info'
  await page.locator('#checkout-step-payment-info').click();

  // Click the button 'Continue'
  await page.getByRole('button', { name: 'Continue' }).click();

  // Click the button 'Continue'
  await page.getByRole('button', { name: 'Continue' }).click();

  // Click the heading element with the name 'Thank you'
  await page.getByRole('heading', { name: 'Thank you' }).click();

  // Click the button 'Continue'
  await page.getByRole('button', { name: 'Continue' }).click();
});
To run the tests and view the results using Playwright Codegen, follow these steps:
1. Open the test file
2. Click the Play icon to start running the tests.
3. The test runner will execute the tests and display the progress and results in the integrated Terminal within VS Code.
Running 1 test using 1 worker
  1 passed (12.9s)

> Test run finished at 6/15/2023, 12:19:26 PM <
Once the test execution is completed, you can navigate to the Test Results view.
In the Test Results view, you will see a list of executed tests along with their statuses (passing, failing, or pending).
Editing Generated Code by Adding Assertions
Playwright Codegen’s flexibility in allowing me to edit the generated code was an especially appealing feature. Although the generated code offered a good foundation, I was free to improve it by adding assertions to confirm the desired application behavior.
This gave me confidence that my tests were reliable and comprehensive.
Here is an example of editing generated code by adding assertions:
// Click on the 'Computers' link
  await page.getByRole('link', { name: 'Computers' }).click();

  // Click on the 'Notebooks' link within the 'Notebooks' heading
  await page.getByRole('heading', { name: 'Notebooks' }).getByRole('link', { name: 'Notebooks' }).click();

  // Click on the 'Apple MacBook Pro 13-inch' link
  await page.getByRole('link', { name: 'Apple MacBook Pro 13-inch', exact: true }).click();

  // Click on the 'Add to cart' button
  await page.locator('#add-to-cart-button-4').click();

  // Verify success message
  await expect(page.locator('#bar-notification .content')).toHaveText('The product has been added to your shopping cart');

  // Click on the 'Close' button
  await page.getByTitle('Close').click();

  // Click on the 'Shopping cart (2)' link
  await page.getByRole('link', { name: 'Shopping cart (2)' }).click();

  // Check the checkbox with the label
  await page.getByLabel('I agree with the terms of service and I adhere to them unconditionally').check();

  // Click the button 'Checkout'
  await page.getByRole('button', { name: 'Checkout' }).click();

  // Click the button 'Continue'
  await page.getByRole('button', { name: 'Continue' }).click();

  // Check the shipping method
  await page.getByLabel('Next Day Air ($0.00)').check();

  // Click the button 'Continue'
  await page.getByRole('button', { name: 'Continue' }).click();

  // Select payment method
  await page.getByRole('radio', { name: 'Check / Money Order' }).check();

  // Click the button 'Continue'
  await page.getByRole('button', { name: 'Continue' }).click();

  // Confirm payment info
  await page.locator('#checkout-step-payment-info').click();

  // Click the button 'Continue'
  await page.getByRole('button', { name: 'Continue' }).click();

  // Click the button 'Confirm'
  await page.getByRole('button', { name: 'Confirm' }).click();

  // Verify the text
  await expect(page.getByText('Your order has been successfully processed!')).toBeVisible();

  // Click the button 'Continue'
  await page.getByRole('button', { name: 'Continue' }).click();
});
The above code has added assertions using Playwright’s expect function. These assertions validate that specific elements or texts are visible or present on the page, ensuring the application’s expected behavior under test.
Handling Issues with Viewport
During my experience with Playwright Codegen, I encountered some issues related to viewport settings. Playwright Codegen is using default viewport size that does not always match with our testing requirements. This can lead to visual inconsistencies and mispositioned elements within the web page. However, I quickly discovered a simple and effective solution. I could handle viewport issues seamlessly by configuring a custom command in the package.json file and running tests from the Terminal using that command.
Here’s how you can set up a custom command in the package.json file and run tests from the Terminal:
1. Open the package.json file in your project directory
2. Locate the “scripts” section and add a new command, such as:
openCodegen: npx playwright codegen — viewport-size=1920,1080
3. Save the package.json file
4. Open the terminal or command prompt and navigate to your project directory.
5. Run the following command to open the Playwright Inspector and set the specified browser viewport size:
PS C:\Playwright> npm run openCodegen
Pros and Cons
Playwright Codegen offers several advantages and drawbacks based on my experience. Here’s a breakdown of the pros and cons from my perspective:
Pros
Rapid Test Creation: Playwright Codegen allows for the quick creation of automation tests by generating code snippets based on user actions. This feature saves time and reduces the need for writing code from scratch.
Language Flexibility: Playwright Codegen supports multiple programming languages, such as JavaScript, Python, and TypeScript. This flexibility enables to work with preferred language and utilize Playwright’s powerful automation capabilities.
Improved Test Readability: Playwright Codegen produces clean, readable code using descriptive function names and explicit element locators. This makes the test scripts more understandable, allowing for easier collaboration and code review.
Cons
Limited Test Scenario Coverage: While Playwright Codegen helps automate common user actions, it may only cover some possible test scenarios. Additional test scenarios and edge cases require manual coding beyond the generated snippets in complex applications.
Lack of Customization: The generated code is based on recorded user actions, which may only sometimes align with specific testing requirements. Customization such as adding assertions, data validation, or dynamic test flows may require manual modifications to the generated code.
Maintenance Challenges: As the application changes, the generated code may require updates to reflect the updated UI structure. Reviewing and maintaining the generated code regularly is essential to ensure it remains relevant and accurate.
In conclusion, Playwright Codegen is a valuable tool for accelerating the initial creation of automation tests. It offers language flexibility, enhances test maintenance, and improves test readability. However, it is essential to know its limitations and invest time in learning Playwright’s API to customize and maintain the generated code effectively. Playwright Codegen can be a powerful asset in the automation testing toolkit by striking a balance between code generation and manual coding.

